Earth Science Week Classroom Activities
Earthquake Machine

Activity Source:
Incorporated Research Institutions in Seismology, 2005. Adapted with permission.
Materials:
- 1 - One foot piece of 2x4 scrap wood
- 1 - 4"x36" Sanding Belt, 50 Grit
- 1 - 1/3 Sheet of Sandpaper, 60 Grit
- 2 - Screw Eye 12x1-3/16
- 1 - Bag of Rubber bands, varying size
- 16 in of Duct Tape
- 2 - Cloth measuring tapes with both English and metric markings
- 1 - Manila Folder
- Saw
- Needle Nose Pliers
- Scissors
- Glue (White or Contact Cement)
- Pencil
Procedure:
- Using the tape measure and pencil, divide the one-foot length of 2" x 4" into two 4" blocks.
- Using the saw cut along your markings to create two 4" x 4" blocks
- Trace one of the blocks on the back of the sandpaper & use the scissors to cut out squares
- Glue the sandpaper square to Block A
- Screw one 12x1-3/16 screw eye into a cut end of block A
- Screw one 12x1-3/16 screw eye into Block B
- Using the needle nose pliers, carefully bend the screw eye on Block A opened just enough to allow a rubber band to fit through.
- Using scissors cut the sanding belt so it is no longer a connected loop
- Using pliers remove the metal ends from one of the measuring tapes.
- Using scissors cut the measuring tape without the metal ends up the middle lengthwise, being careful to leave the cm markings intact.
- Discard the half of the split measuring tape marked in English.
- Cut four strips out of the manila folder; two that are 3cm wide and 15cm long, and two that are 3cm wide and 23cm long.
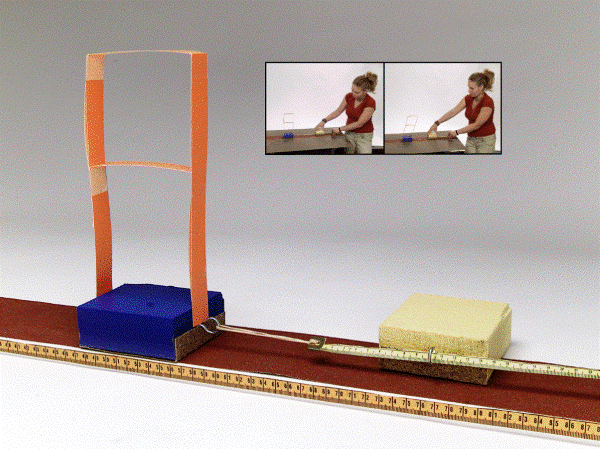
- Assemble the strips of manila folder with tape as shown if Figure 3 and tape to the top of Block A.
Setup for Use In the Lab
- Using duct tape, secure one end of the sanding belt to the lab table.
- Stretch the sanding belt out tightly and tape the second end to the lab table so that there are no waves in the sanding belt.
- On the side of the sanding belt nearest you tape down the uncut measuring tape with the metric side up in the same fashion as the sanding belt.
- Place block C on edge, on the right end of the sanding belt so that the screw eye is positioned in the center of the sanding belt.
- Using a long piece of duct tape, tape block C down to the tabletop for added support.
- Thread the split measuring tape through the screw eye and pull it to the far left end of the sanding belt.
- Fold 5 cm of the end of the split measuring tape back on top of itself with a rubber band in the loop. Use duct tape to secure the loop so that the rubber band is attached to the end of the measuring tape.
- Hook the rubber band into one of the screw eyes of block B. (*Note - If Block does not stick-slip you may need to daisy chain several rubber bands together)

Incorporated Research Institutions in Seismology, 2005.

Incorporated Research Institutions in Seismology, 2005.
Incorporated Research Institutions in Seismology, 2005.
Full Activity (Note: Newsletter are in a pdf format. To download the free Adobe Acrobat Reader software, click here.)

