Earth Science Week Classroom Activities
Modeling an Oil Reserve

Activity Source:
Adapted with permission by the American Association of Petroleum
Geologists
from AGI’s Earth System Science in the Community (EarthComm), 2005.
Background
Since 1970, oil and natural gas have provided more than half of the energy used each year in the United States to produce electricity, heat, transportation fuels, and many everyday products from balloons to vitamins. Oil and natural gas are forms of petroleum, a word that literally means “oily rock.” Petroleum is called a fossil fuel because it is geologically very old and is found in the ground, like fossils.
Abundant oil and natural gas form only where conditions in the Earth are just right. Doing this investigation will help you understand how geoscientists identify and explore petroleum-rich reserves.
Materials
- A cardboard box or other opaque container with cardboard lid
- Sand
- Marker pens
- Clear plastic drinking straws
- Graph paper
- Small rock samples
- Balloon with water
- Food coloring
- Masking tape
- Bamboo kebab skewer
Procedure
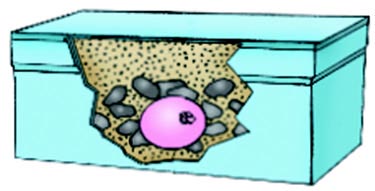
1. In a small box or opaque container set up the model similar to the one shown in the illustration. Place a small balloon containing colored water (to represent oil) into the layers. Think carefully about where to place your oil reserves in the model. Putting it in the middle might be too obvious, or placing it against the side of the box might be too confusing!
AGI
Mark the sides of the box “North”, “South”, “East”, and “West”. Make a map of your model to show the location of the water-balloon. Place a lid securely on the box and fasten it with masking tape. Exchange your model with another group.
2. With the other group’s box, you will model the method used by exploration geologists in the field. You may not move the box, and you may not look inside it. Attach graph paper to the lid of the box. Tap on the box and listen for an area that “sounds different.” Use the graph paper to record the locations of areas that sound different and seem like likely candidates for oil exploration.
3. Probe the box to search for “oil” (the water balloon) in the places you identified. Mark off divisions of one centimeter on a bamboo skewer, beginning at the bottom. Use the bamboo skewer to penetrate the box lid at the location where you think the oil may be located.
Probe gently through the sand. Look at the skewer for evidence of “oil.” This
models the drilling process. Remember: Every centimeter of
depth that you drill costs $150,000. In addition, each time you move to a new
spot to drill costs $75,000.
Keep a record of how many centimeters you drill and how many times you move the skewer to a new spot, so you can calculate the total cost of your exploration. Continue drilling until you find “oil.”
4. What was the total cost of your exploration? If you were to start over, how would you change your exploration procedure to save money? Compare your results with the group that constructed the model. Look at their map. Was the oil deposit where they said it should be? What could you have done to make your exploration more cost-effective?