Earth Science Week Classroom Activities
The Slope of Land in Your Community
Activity Source:
Adapted from the American Geosciences Institute’s EarthComm: Understanding your Environment
Background
Landslides constitute a major geologic hazard. They are widespread, occurring in all 50 states, and cause $1-2 billion in damages and more than 25 fatalities on average each year. Landslides commonly occur with other major natural disasters, such as earthquakes and floods (USGS Learning Web).
The slope of the land and the materials under ground must be considered when planning how to build on the land in a community to lessen landslide risk. Changing the slope of the land (or even the amount of vegetation on a slope) can have dangerous consequences. Think about these questions before you begin:
- How would the slope of land control development in a community?
- How might changing the slope of the land create potential hazards for citizens (say, cutting through the land to build a road or housing project)?
Time Needed
One class period
Materials Needed
• 500 mL fine sand
• Funnel
• Protractor
• Newspaper (to cover flat surface)
• Calculator
Instructions
Part A: The Slope of a Sand Pile
- Cover a flat surface (such as a lab table) with newspaper. Slowly pour 500 mL of dry sand through a funnel onto the flat surface so that it makes a pile.
a. Describe what happens to the sides of the pile as you pour the sand.
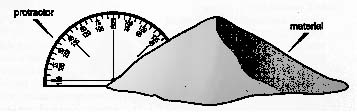
- Hold a protractor upright (with the bottom edge held against the flat surface) and carefully begin to slide it behind the pile as shown in the diagram.
AGI
-
At the point where the curved upper edge of the protractor intersects the surface of the pile of sand, read the angle in degrees. This is the natural angle of the side (slope) of the pile. It is called the angle of repose. It is the steepest slope that can be formed in the material without slumping or sliding of the material down the slope.
-
Repeat step 3 several times.
a. Record the measurement of the angle of the slope each time.
b. Do you get the same angle each time? Why or why not?
c. Why is it important to make this measurement several times?
d. What do you think will happen to the angle with a greater or lesser amount
of sand?
- Repeat steps 1, 2 and 3 using different amounts of sand.
a. Record the measurement of the angle of the slope each time.
b. Does the angle of the slope change? If so, how much?
- Pour extra sand onto a pile of sand several times.
a. Record the measurement of the angle of the slope each time.
b. Does the angle of the pile change?
Part B: The Slope of Other Materials
- Obtain some or all of the following dry materials; fine sand, coarse sand, clay or mud, gravel, silt, soil, table salt, granulated sugar.
a. Predict what would happen if you repeated the activity in Part A using these materials.
- For each of the available materials repeat the following procedures:
• Place a handful of the materials in a dry container such as a can or jar.
• Cover the container with a piece of cardboard.
• Turn the container upside down onto a flat surface.
• Lift the container very slowly. The material should form an inverted, cone
shaped pile.
• Measure the angle of the slope of the pile.
• Make three measurements for each material.
a. Record your measurement on a copy of a chart like the one below.
b. How does particle size and shape relate to the maximum slope angle the
particles will maintain?
| Material | Angle Measure of Slope | Average Angle |
|---|---|---|
| Fine sand | ||
| Coarse Sand | ||
| Clay | ||
| Gravel | ||
| Silt | ||
| Soil |